

Evaluating local large language model (LLM) performance before scaling to enterprise production doesn’t require complex infrastructure. With Red Hat Enterprise Linux (RHEL) and Red Hat AI Inference, you can launch, benchmark, and test an OpenAI-compatible server on your local hardware in minutes.
Many enterprise teams want the speed and privacy of local AI without relying on external Software-as-a-Service (SaaS) APIs. In this guide, you’ll learn how to deploy an inference container, benchmark its performance under simulated traffic with GuideLLM, and connect a chat interface with Open WebUI to evaluate model quality, all on your own hardware. We’ve also prepared a video demo.
Requirements
- OS: RHEL 10.2
- CPU Architecture: x86_64
- GPU: any number of NVIDIA or AMD GPUs
- VRAM: model-dependent, but generally 8GB
- Storage: ~45 GB for Podman images + size of the model weights
- Red Hat Registry Access: required to login for access to the GuideLLM and Red Hat AI Inference images
- Hugging Face Token (optional): required to access gated models
Ensure that the proper drivers and toolkits (NVIDIA container toolkit or AMD’s ROCm drivers) are installed on the host for your inference container to connect to your hardware.
Step 1. Preflight steps
Log in to the Red Hat Registry and pull the proper Red Hat AI Inference image, based on your hardware.
podman login registry.redhat.io

# Only for NVIDIA
podman pull registry.redhat.io/rhaii/vllm-cuda-rhel9:3.5.0

# Only for AMD
podman pull registry.redhat.io/rhaii/vllm-rocm-rhel9:3.5.0
All the images you’ll be using in this blog are on the Red Hat Ecosystem Catalog page.
To speed up subsequent deployments, create a cache directory to mount to the container. The first time the model is pulled, it will be saved here.
mkdir -p ~/rhaii-cache
Export your Hugging Face token if you plan on using any gated models.
export HF_TOKEN=hf_XXXXXXXXXXXXXXXXXXXXXX
Next, decide which model you want to run. Your model choice depends on your GPU VRAM, target latency thresholds, and expected prompt length. Check out the Red Hat AI page on Hugging Face for validated open weight models.
The table below shows recommended models based on VRAM. A general rule of thumb is to choose a model that takes up about 90% of your available VRAM.
This includes space for the model weights and past conversation data, or Key Value (KV) cache, to prevent out-of-memory (OOM) errors. As context length increases, allowing longer chat sessions, the space needed for KV cache scales linearly. Since we’re using a relatively small context length, we mostly concern ourselves with the size of the model weights, which can be found under the Files and Versions tab of each model’s Hugging Face page.
Refer to the table below as a guide for selecting your model, or, for a more interactive recommendation, check out llm-d Planner.
| Total VRAM | Recommended models |
|---|---|
| 8 GB | RedHatAI/Llama-3.2-1B-Instruct-FP8-dynamic |
| 16 GB – 24 GB | RedHatAI/Qwen3.5-9B-FP8-dynamic |
| 32 GB – 48 GB | RedHatAI/Qwen3.6-35B-A3B-NVFP4 |
| 80 GB | RedHatAI/gemma-4-31B-it-FP8-block |
| 160 GB+ | RedHatAI/Qwen3-235B-A22B-NVFP4 |
For our single L40S GPU (48 GB VRAM), we’ll use RedHatAI/Qwen3.6-35B-A3B-NVFP4.
# Choose your model, paste their Hugging Face path
export MODEL_ID=RedHatAI/Qwen3.6-35B-A3B-NVFP4

# Declare the number of GPUs you plan to you (enough total VRAM for the model to fit)
export NUM_GPU=1
Step 2. Run Red Hat AI Inference
Based on your hardware, use the Podman CLI to run one of the following commands:
# NVIDIA
podman run --rm -it \
  --name inference-server \
  -p 8000:8000 \
  --device nvidia.com/gpu=all \
  --ipc=host \
  --security-opt=label=disable \
  --userns=keep-id:uid=1001 \
  -v rhaii-cache:/opt/app-root/src/.cache:Z \
  -e "HF_TOKEN=$HF_TOKEN" \
  -e HF_HUB_OFFLINE=0 \
  registry.redhat.io/rhaii/vllm-cuda-rhel9:3.5.0 \
  --model "$MODEL_ID" \
  --host 0.0.0.0 \
  --gpu-memory-utilization 0.9 \
  --max-model-len 16384 \
  --tensor-parallel-size "$NUM_GPU" \
  --enable-auto-tool-choice \
  --tool-call-parser hermes \
  --reasoning-parser qwen3
# AMD
podman run --rm -it \
  --name inference-server \
  -p 8000:8000 \
  --device /dev/kfd \
  --device /dev/dri \
  --group-add keep-groups \
  --ipc=host \
  --security-opt=label=disable \
  --userns=keep-id:uid=1001 \
  -v rhaii-cache:/opt/app-root/src/.cache:Z \
  -e "HF_TOKEN=$HF_TOKEN" \
  -e HF_HUB_OFFLINE=0 \
  registry.redhat.io/rhaii/vllm-rocm-rhel9:3.5.0 \
  --model "$MODEL_ID" \
  --host 0.0.0.0 \
  --gpu-memory-utilization 0.9 \
  --max-model-len 16384 \
  --tensor-parallel-size "$NUM_GPU" \
  --enable-auto-tool-choice \
  --tool-call-parser hermes \
  --reasoning-parser qwen3
Flags before the image name configure the container runtime, while flags after it set up the vLLM server parameters. The --device flag exposes GPU hardware (NVIDIA or AMD), while -v mounts the cache directory so model weights persist across restarts. The value passed to the --reasoning-parser flag is specific to the Qwen3 family of models. If you’re using another model that outputs think tags, check out the vLLM documentation for compatible parser values. If your model does not use think tags, then you can omit this flag.
For more information on any flags you might want to include or modify based on your setup, consult the vLLM recipes page and search for your model of choice.
The model is reachable once the logs from the container read like the below:
(APIServer pid=1) INFO 08-24 18:14:49 [api_server.py:581] Starting vLLM server on http://0.0.0.0:8000
This will be followed by all of the available API routes to reach the model.
Now that the model is serving, let’s send a couple of curl requests to some of those routes.
First, let’s ensure that the server is reachable.
curl -sf http://127.0.0.1:8000/health > /dev/null && echo "Server is healthy!"
Next, send your first inference request.
curl -s http://127.0.0.1:8000/v1/chat/completions \
  -H "Content-Type: application/json" \
  -d '{
    "model": "'"$MODEL_ID"'",
    "messages": [
      {
        "role": "system",
        "content": "You are an enterprise IT strategist who provides concise, business-focused advice."
      },
      {
        "role": "user",
        "content": "What are a couple pros for running your models on-prem?"
      }
    ],
    "max_tokens": 1000,
    "temperature": 0.7
  }' | jq
Note: jq formats the JSON response from the server, but if it’s not installed, install via your package manager or omit | jq entirely.
Congratulations—your model is active and ready to process requests.
Next, we’ll benchmark the server’s performance on your hardware.
Step 3. Benchmarking
In a new terminal session, pull the GuideLLM image from the Red Hat registry. GuideLLM is a platform under the vLLM project for evaluating LLMs, intended to provide an assessment of performance on your hardware.
Confirm authentication and pull the GuideLLM image while the model is still serving.
# confirm authentication
podman login registry.redhat.io
# pull the GuideLLM image
podman pull registry.redhat.io/rhai/guidellm-rhel9:3.5.0
The PSAP benchmark guide outlines several testing strategies. For this run, we’ll simulate realistic traffic patterns that mirror how end users interact with the server. Export the environment variable pair below that matches your intended use case.
# For balanced use cases (for general use, chat bot behavior)
export PROMPT_TOKENS=1000
export OUTPUT_TOKENS=1000

# For decode-heavy use cases (long-form generation, coding)
export PROMPT_TOKENS=512
export OUTPUT_TOKENS=2048

# For prefill-heavy use cases (brief summarizations for long documents)
export PROMPT_TOKENS=2048
export OUTPUT_TOKENS=128
Then re-export the model name, which can be done quickly with the following command.
export MODEL_ID=$(curl -s http://127.0.0.1:8000/v1/models | jq -r '.data[0].id')
With GuideLLM, we’ll be running concurrency benchmarking by simulating the server under the load of 1 to 100 users, which is declared under the profile flag. You can adjust this range or explore other test profiles in the GuideLLM documentation. For this walkthrough, I’ve set the max duration for each stream to 3 minutes, but for more comprehensive results, you may consider extending this to 10 minutes (as used in the PSAP guide).
To run GuideLLM, paste the following command in your terminal:
podman run --rm -t \
  --net=host \
  --name guidellm-benchmark \
  --security-opt=label=disable \
  --userns=keep-id:uid=1001 \
  -v ~/.guidellm/results:/results:Z \
  -e "HF_TOKEN=$HF_TOKEN" \
  registry.redhat.io/rhai/guidellm-rhel9:3.5.0 \
  guidellm run \
  --backend "kind=openai_http,target=http://127.0.0.1:8000,model=${MODEL_ID}" \
  --data "kind=synthetic_text,prompt_tokens=${PROMPT_TOKENS},output_tokens=${OUTPUT_TOKENS}" \
  --profile '{"kind":"concurrent","streams":[1,5,10,25,50,100]}' \
  --constraint "kind=max_duration,seconds=180" \
  --output "kind=json,path=/results/benchmark.json" \
  --output "kind=html,path=/results/benchmark.html"
You’ll see progress updates followed by a table of results once it finishes. They should look something like these:
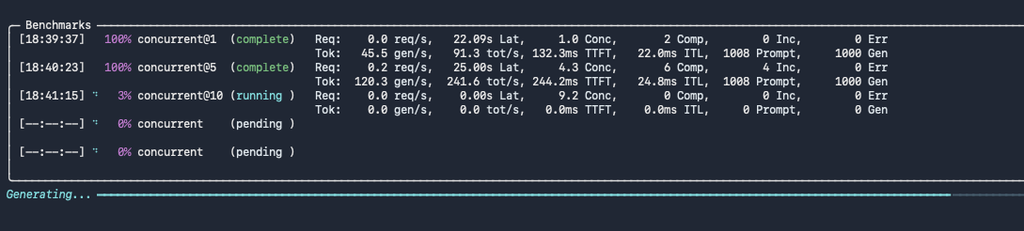
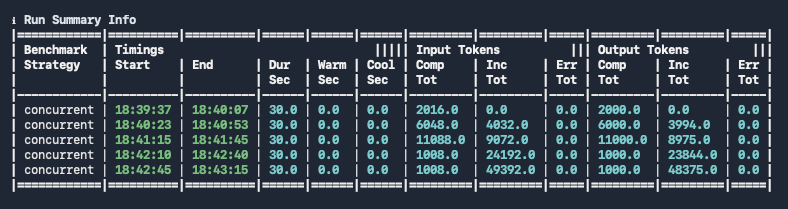
Open the generated HTML file under ~/.guidellm/results/ in your browser.
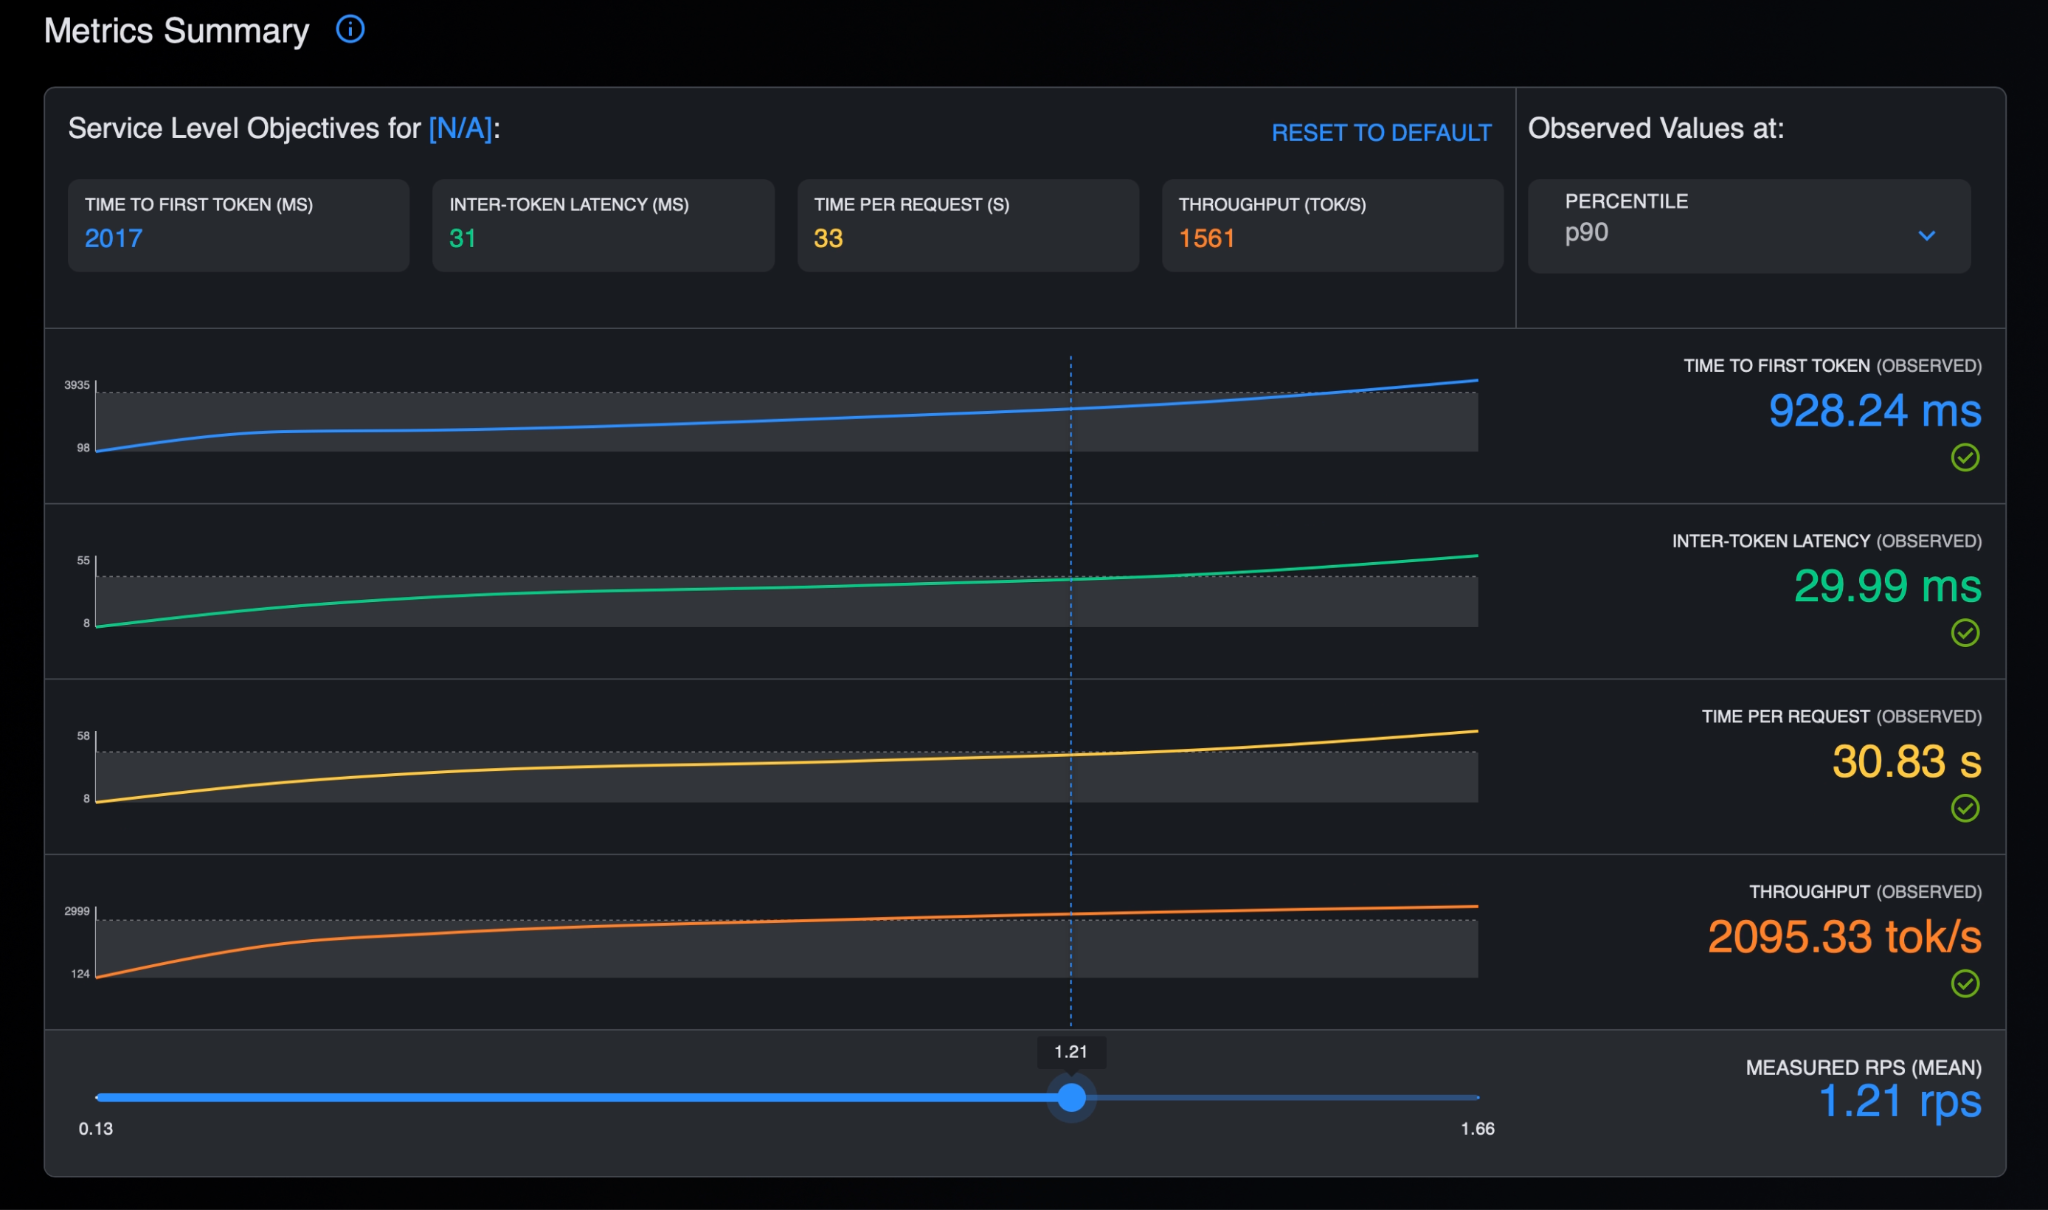
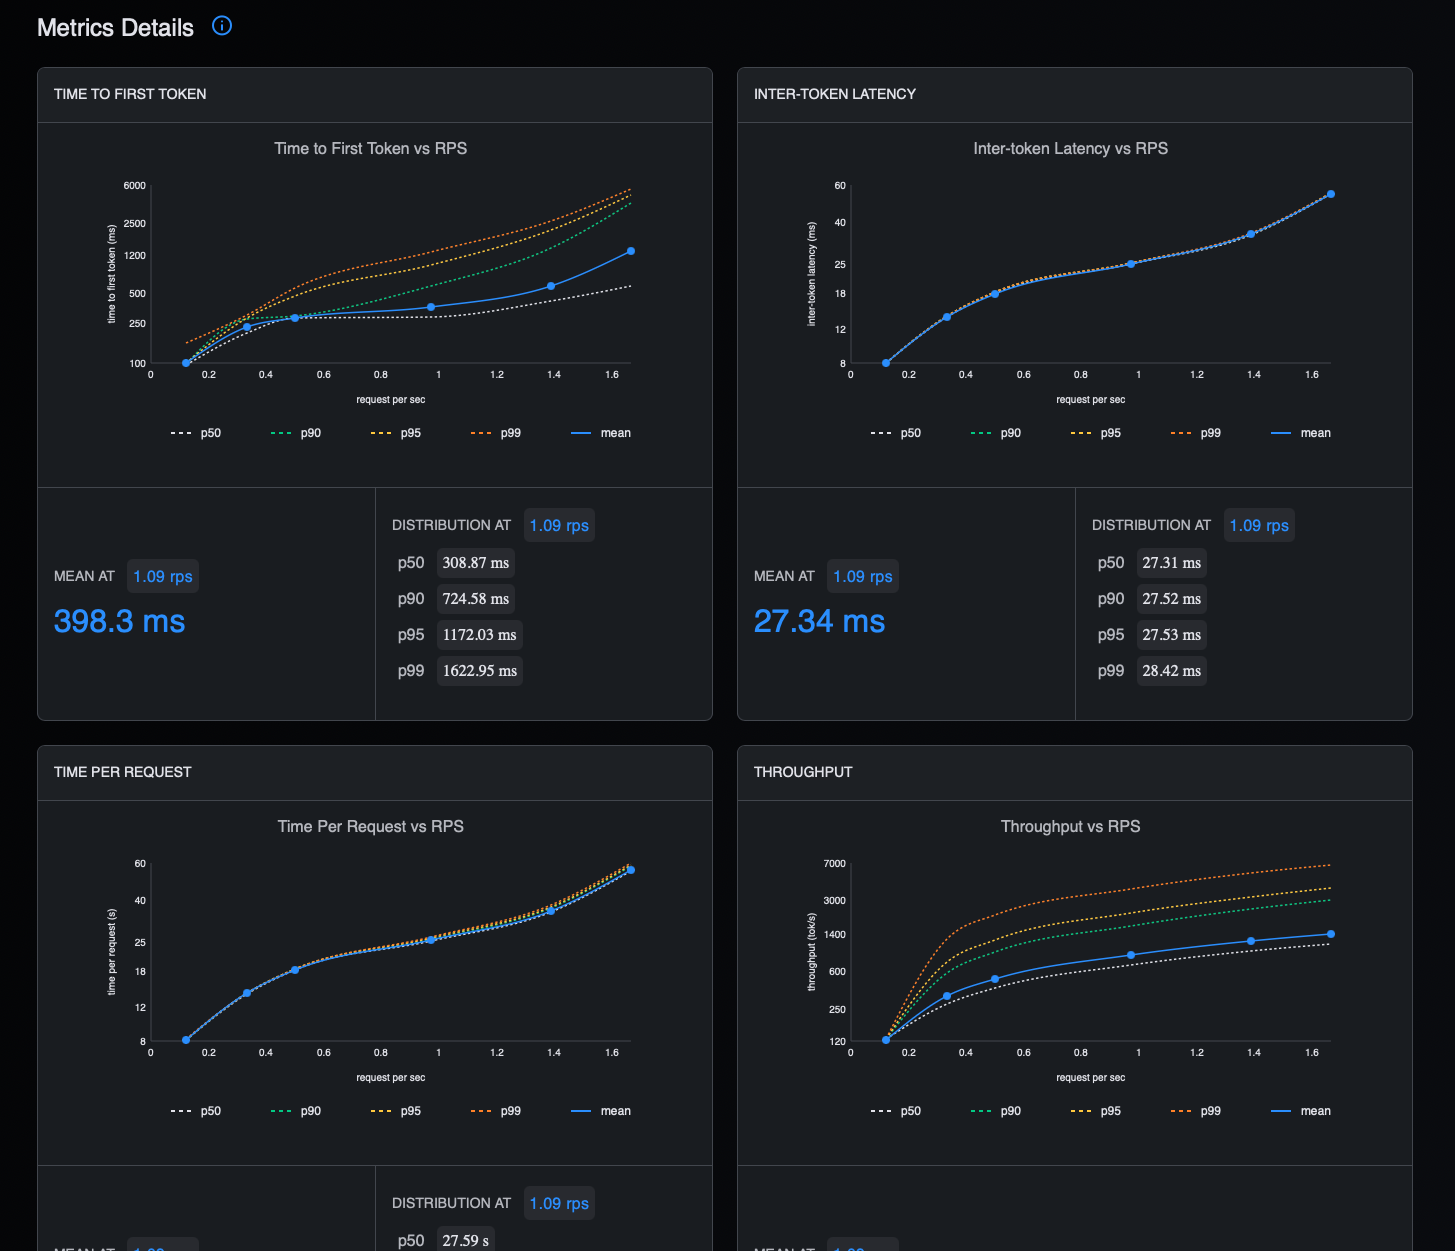
The workload report visualizes the benchmarking so you can compare key performance metrics across different rates of traffic (requests per second) and percentile groups (how performance breaks down across your requests, where “p99” reflects the worst 1% of experiences).
Time to First Token (TTFT) tracks how quickly the model generates the first token to your request, or the perceived waiting time. Inter-token Latency (ITL) measures the time between tokens, or the pace of the response once the model has begun to respond. Throughput captures the number of tokens per second that the server is processing, or how much the server can handle at once. You can use this report to decide whether your current model and hardware stack satisfies target metrics for your use case.
Step 4. Enabling a user interface
Before we put it to the test, let’s render a user interface to chat with our model. Run the following podman command on the remote machine:
podman run -d \
  --name open-webui \
  --network host \
  -v open-webui:/app/backend/data:Z \
  -e WEBUI_AUTH=false \
  -e OPENAI_API_BASE_URL=http://127.0.0.1:8000/v1 \
  --restart always \
  ghcr.io/open-webui/open-webui:main
Navigate to 127.0.0.1:8080 in your browser to see the UI.
If you’re running all of this on a remote machine and want to see the UI on your local machine, running the following port forwarding from your local machine:
ssh -N -L 8080:127.0.0.1:8080 <username>@<remote-server-ip>
Your browser should display the following interface, where you’ll be able to chat with your model in natural language:
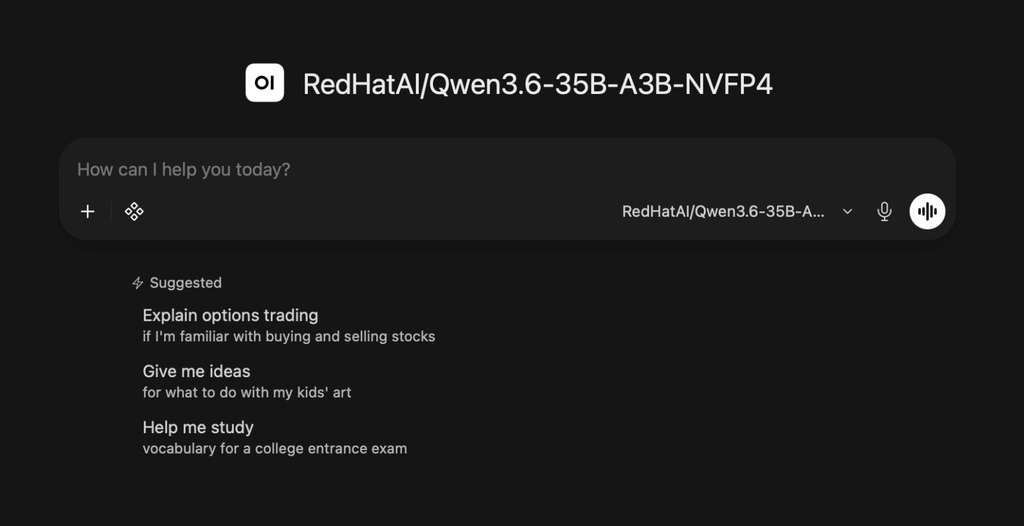
Alt: The Open WebUI chat interface for model RedHatAI/Qwen3.6-35B-A3B-NVFP4.
Step 5. Putting the model to the test
To give you a more conversational sense of your models’ capabilities, I’ve added the following prompts that you can paste into Open WebUI. You can then compare the models’ responses against the expected solutions below.
Note: increase the model –max-model-len for longer-running tasks.
Logical reasoning prompt
Let’s play a logic game. I have chosen a secret 5-digit number using a unique permutation of the digits 1 through 5 (e.g., 31524).
Rules:
- On your turn, submit a 5-digit guess using digits 1–5 without repeating any digit.
- I will respond only with the total number of digits that are in the exact correct position (0 to 5).
- Try to guess the secret number in as few attempts as possible.
Please make your first guess.
Solution:
Minimum number of guesses to guarantee the correct answer: 6
Summarization prompt
Read the following article (a Red Hat Developer blog post by Michael Santos) and provide a comprehensive summary in 3-4 short bullet points that capture the main points, key findings, and implications.
A generative AI (gen AI) model is trained using a variety of texts from the internet. Instead of focusing on specifics, the model is trained to be general, allowing it to come up with creative answers, engage in complex conversations, and even display a sense of humor. Despite this, AI doesn’t possess comprehension, understanding, or belief. Its responses are generated based on patterns learned from training data.
AI systems like any large language model (LLM) are reflections of humanity’s collective knowledge in a single interface. These models’ intelligence comes from their success as prediction machines, which allows them to emulate human interaction in a conversational format.
The way gen AI models operate is based on the concept of tokens, which are discrete units of language ranging from individual characters to whole words. These models process a specific number of tokens at a time using complex mathematical calculations to predict the most likely next token in a sequence.
Models like generative pre-trained transformers (GPTs) generate text one token at a time. After producing each token, the model reviews the entire sequence it has generated so far and processes it again to generate the next token. This recursive process continues until the final token completes the generated text.
This means that the quality of the AI’s response depends on the prompt or instruction that a user provides. In other words, the way we interact with and instruct AI significantly influences the quality of the answers it produces.
Prompt engineering refers to the practice of designing and crafting effective prompts or instructions for AI models to achieve desired outputs. In the context of language models like GPTs, prompt engineering involves formulating input text that leads the model to generate accurate, relevant, and contextually appropriate responses.
Effective prompt engineering is important because language models don’t possess true understanding or common sense reasoning. They generate responses based on patterns learned from training data. Crafting well-designed prompts can help guide the model to produce more accurate and meaningful outputs, while poorly formulated prompts might lead to incorrect or nonsensical results.
Prompt design is the systematic crafting of well-suited instructions for an LLM, with the aim of achieving a specific and well-defined objective. This practice combines both artistic and scientific elements, including:
Understanding the LLM: Different LLMs respond differently to the same prompt. Additionally, certain language models might have distinct keywords or cues that trigger specific interpretations in their responses.
Domain expertise: Proficiency in the relevant field is crucial while formulating prompts. For example, creating a prompt to answer a physics problem requires knowledge of physics.
Iterative process and evaluating quality: Devising the perfect prompt often involves trial and refinement. Having a method to assess the quality of the generated output that goes beyond subjective judgment is essential.
Solution:
Pattern Prediction Over Comprehension: Generative AI models function as statistical prediction engines rather than conscious entities, generating text recursively token-by-token based on learned patterns without genuine understanding or reasoning.
Input-Driven Output Quality: Because models lack inherent comprehension, the accuracy, relevance, and utility of their responses are directly determined by the instructions provided in the user prompt.
Prompt Engineering as a Guiding Framework: Systematic prompt design bridges the gap between probabilistic text generation and desired results, steering the AI toward precise outputs while preventing hallucinations or nonsensical answers.
Execution Demands Expertise and Iteration: Effective prompt crafting requires a balance of model-specific behavior awareness, relevant domain expertise, and continuous, objective testing and refinement.
Programming prompt
Write a Python CLI script that reads pending meeting requests for a VIP user from standard input (sys.stdin), calculates the maximum total number of unique meetings that can be scheduled without any time overlaps, and prints the integer result to standard output (stdout).
Each meeting request contains a name and a list of alternative acceptable time slots. Each time slot is represented as [start_minute, end_minute] in minutes from midnight.
Constraints and specifications:
- A meeting can only be assigned to at most one of its provided time slots.
- Two meetings overlap if they share any time window. For example, [10, 30] and [30, 50] do not overlap (the boundary is exclusive), but [10, 31] and [30, 50] do.
- If a meeting cannot fit into the overall schedule without causing a conflict, it must be skipped.
- The script must accept a single JSON-formatted string via stdin, process the input using a function max_meetings_booked(meetings), and print only the resulting integer count.
Input format (JSON via standard input):
[
  {"name": "Meeting A", "slots": [[540, 600], [840, 900]]},
  {"name": "Meeting B", "slots": [[570, 630]]},
  {"name": "Meeting C", "slots": [[600, 660], [870, 930]]}
]
CLI execution command:
python solution.py < input.json
Output format: An integer printed to stdout representing the maximum count of successfully scheduled unique meetings.
Expected output for the input above: 2
Other test cases with their expected output (don’t paste):
[
  {"name": "Team Standup", "slots": [[540, 570]]},
  {"name": "1-on-1", "slots": [[570, 600]]},
  {"name": "Client Call", "slots": [[600, 660]]}
]
Expected output: 3
[
  {"name": "Design Sync", "slots": [[600, 660]]},
  {"name": "Product Review", "slots": [[600, 660]]},
  {"name": "Engineering Alignment", "slots": [[600, 660]]}
]
Expected output: 1
[
  {"name": "Interview A", "slots": [[500, 550]]},
  {"name": "Interview B", "slots": [[520, 570], [600, 650]]},
  {"name": "Interview C", "slots": [[550, 600]]}
]
Expected output: 3
[
  {"name": "All-Hands", "slots": [[500, 600], [700, 800]]},
  {"name": "Budget Sync", "slots": [[500, 600]]},
  {"name": "Strategy Session", "slots": [[700, 800]]}
]
Expected output: 2
What’s next?
You’ve now successfully deployed an AI inference server on your own hardware, benchmarked its performance, and put your model to the test.
To scale your local inference to a production cluster or for other related Red Hat software, explore Red Hat AI Quickstarts, a variety of innovative AI use cases from our community. They are simple, focused examples designed for fast and easy deployment on the Red Hat AI platform.
Note: Red Hat’s Emerging Technologies blog includes posts that discuss technologies that are under active development in upstream open source communities and at Red Hat. We believe in sharing early and often the things we’re working on, but we want to note that unless otherwise stated the technologies and how-tos shared here aren’t part of supported products, nor promised to be in the future.


