

What if your standard-issue CPU infrastructure could serve as a hub for enterprise AI? With the right tools, it can. You can deploy a large language model on CPU inside a container on Red Hat Enterprise Linux (RHEL), query it via an OpenAI compatible REST API, and measure its throughput and latency with reproducible benchmarks. This comprehensive guide details the deployment of Red Hat AI Inference 3.5 and demonstrates automated performance evaluation using the cpueval CLI toolchain.
- Container deployment: Pull and launch the containerized Red Hat AI Inference CPU engine using Podman
- API verification: Verify model readiness and execute inferencing using standard REST endpoints
- Performance benchmarking: Automate stress testing, measure throughput (Tok/s), TTFT, and ITL/TPOT using cpueval
For single-machine deployment: everything in this guide runs on a single RHEL host. You do not require a separate external load generator, complex cluster orchestration, or dedicated cloud VMs to begin benchmarking.
Why deploy Red Hat AI Inference on CPUs?
Red Hat AI Inference delivers enterprise-hardened, production-grade vLLM images engineered specifically for high-throughput CPU performance on Intel and AMD architectures. Running LLM inference on server CPUs provides critical operational advantages:
- Pre-deployment evaluation permits thorough tests of model accuracy and API compatibility before allocating costly GPU resources.
- Cost-optimized edge serving allows you to deploy small language models (SLMs) efficiently in edge or budget-constrained environments.
- Standardized benchmarking lets you establish rigorous performance baselines across CPU hardware generations with standardized methodologies.
Prerequisites and hardware requirements
Before initiating the deployment, verify that your environment satisfies the following operational requirements:
- Host operating system: RHEL 10.2 (or binary-compatible enterprise distribution) configured with active Podman container engine.
- Processor architecture: modern x86_64 server architecture equipped with AVX-512/AMX vector instruction sets. Intel Xeon 6 (Granite Rapids) is the validated reference architecture for this guide; Intel Xeon Scalable and AMD EPYC processors with AVX-512 are also supported.
- System memory and compute: minimum 16 physical CPU cores and 32 GB RAM. For concurrent benchmarking with 8B parameter models, 32+ cores and 64 GB+ RAM is recommended. This guide was validated on an AWS c8i.12xlarge (48 vCPUs, 96 GB RAM). At 8 cores, an 8B quantized model delivers ~9 tok/s, which is functional but slow; 16 cores. yields ~15 tok/s at concurrency=1; and 32 cores reaches ~283 tok/s at concurrency=32.
- Registry authentication: valid Red Hat Customer Portal credentials to pull container images from registry.redhat.io.
- Model access token: optional Hugging Face user access token for downloading gated model repositories (e.g., Meta Llama).
Note: this guide was validated on an AWS c8i.12xlarge instance running RHEL 10.
Authenticate and pull the Red Hat AI Inference container image
Authenticate against the Red Hat Container Registry and pull the Red Hat AI Inference CPU container image. Red Hat AI Inference 3.4 is available here.Red Hat AI Inference 3.5 is available here.
This guide leverages the Red Hat AI Inference 3.5 GA container tag. Images are available here.
# Authenticate with your Red Hat Customer Portal or service account
podman login registry.redhat.io
# Pull the Red Hat AI Inference 3.5 CPU image
podman pull registry.redhat.io/rhaii/vllm-cpu-rhel9:3.5.0-1786546771
Create a dedicated persistent cache directory on the host to retain downloaded Hugging Face model weights across container restarts.
mkdir -p ~/rhaii-cache
If you plan to use gated models (such as Meta Llama 3), export your Hugging Face API access token in your terminal session.
export HF_TOKEN=hf_xxxxxxxxxxxxxxxxxxxxxxxxxxxxxxxxxx
Warning: Maintain consistent sudo context
Root and non-root user sessions maintain distinct Podman credential stores and local storage layers. If you execute sudo podman login, you must consistently use sudo podman pull and sudo podman run to avoid authentication mismatches.
Launch the Red Hat AI Inference instance
Start the vLLM engine within the Red Hat AI Inference container. In this example, we use Qwen2.5-7B-Instruct.
podman run --rm -it \
  --name RHAII-hello \
  --security-opt=label=disable \
  --shm-size=4g \
  -p 8000:8000 \
  --userns=keep-id:uid=1001 \
  --env "HUGGING_FACE_HUB_TOKEN=${HF_TOKEN:-}" \
  --env "HF_HUB_OFFLINE=0" \
  --env "VLLM_CPU_KVCACHE_SPACE=10" \
  -v ~/rhaii-cache:/opt/app-root/src/.cache:Z \
  registry.redhat.io/rhaii/vllm-cpu-rhel9:3.5.0-1786546771 \
  --model Qwen/Qwen2.5-7B-Instruct \
  --host 0.0.0.0 \
  --enable-auto-tool-choice \
  --tool-call-parser hermes
| Container flag / variable | Technical purpose and description |
| –security-opt=label=disable | Bypasses SELinux labeling restrictions when bind-mounting host directories |
| –shm-size=4g | Allocates shared memory for inter-process worker communications (scale to 8g for 8B models) |
| –userns=keep-id:uid=1001 | Maps the host user ID directly to container application execution context |
| VLLM_CPU_KVCACHE_SPACE=10 | Allocates 10 GB of host RAM specifically for the CPU Key-Value (KV) attention cache |
| -v ~/rhaii-cache:…:Z | Binds persistent host volume for weight storage; :Z applies SELinux context |
Wait until the engine finishes loading the model weights into memory and outputs the active endpoint message.
(APIServer pid=1) INFO:     Started server process [1]
(APIServer pid=1) INFO:     Waiting for application startup.
(APIServer pid=1) INFO:     Application startup complete.
Automated threading optimization in Red Hat AI Inference 3.5
Note: Red Hat AI Inference 3.4 requires setting the LD_PRELOAD=/usr/lib64/libomp.so environment variable in the container instance to maximize OpenMP thread utilization. This is already set as an environment variable in Red Hat AI Inference 3.5
Validate endpoint and execute inferencing
Open a secondary terminal session. Red Hat AI Inference exposes a fully compliant OpenAI REST API service on host port 8000.
Step 1. Health endpoint verification
curl -s http://0.0.0.0:8000/health && echo "healthy"
healthy
Step 2. List model inventory
curl -s http://0.0.0.0:8000/v1/models | python3 -m json.tool
{
    "object": "list",
    "data": [
        {
            "id": "Qwen/Qwen2.5-7B-Instruct",
            "object": "model",
            "created": 1785502001,
            "owned_by": "vllm",
            "root": "Qwen/Qwen2.5-7B-Instruct",
            "parent": null,
            "max_model_len": 32768,
            "permission": [
                {
                    "id": "modelperm-9d21eedbb59b4ab7",
                    "object": "model_permission",
                    "created": 1785502001,
                    "allow_create_engine": false,
                    "allow_sampling": true,
                    "allow_logprobs": true,
                    "allow_search_indices": false,
                    "allow_view": true,
                    "allow_fine_tuning": false,
                    "organization": "*",
                    "group": null,
                    "is_blocking": false
                }
            ]
        }
    ]
}
Step 3. Submit a chat completion request
curl -s http://0.0.0.0:8000/v1/chat/completions \
  -H "Content-Type: application/json" \
  -d '{
    "model": "Qwen/Qwen2.5-7B-Instruct",
    "messages": [
      {"role": "user", "content": "Explain CPU inference in one sentence."}
    ],
    "max_tokens": 64,
    "temperature": 0.7
  }' | python3 -m json.tool

{
    "id": "chatcmpl-adf610bb838b26a3",
    "object": "chat.completion",
    "created": 1785502065,
    "prompt_routed_experts": null,
    "model": "Qwen/Qwen2.5-7B-Instruct",
    "choices": [
        {
            "index": 0,
            "message": {
                "role": "assistant",
                "content": "CPU inference refers to the process of using a CPU to execute machine learning models or algorithms to make predictions or decisions based on input data.",
                "refusal": null,
                "annotations": null,
                "audio": null,
                "function_call": null,
                "tool_calls": [],
                "reasoning": null
            },
            "logprobs": null,
            "finish_reason": "stop",
            "stop_reason": null,
            "token_ids": null,
            "routed_experts": null
        }
    ],
    "service_tier": null,
    "system_fingerprint": "vllm-0.21.0+rhaiv.9-2674d125",
    "usage": {
        "prompt_tokens": 37,
        "total_tokens": 65,
        "completion_tokens": 28,
        "prompt_tokens_details": null
    },
    "prompt_logprobs": null,
    "prompt_token_ids": null,
    "prompt_text": null,
    "kv_transfer_params": null
}
Step 4. Optional: Query using OpenWeb UI
Open WebUI provides an intuitive, self-hosted chat interface for your vLLM deployments. Leveraging the OpenAI-compatible API is a seamless way to interact with models running on your infrastructure, featuring robust support for RAG and offline operation.
podman run -d \
  --name open-webui \
  --network host \
  -v open-webui:/app/backend/data \
  -e OPENAI_API_BASE_URL=http://127.0.0.1:8000/v1 \
  --restart always \
  ghcr.io/open-webui/open-webui:main
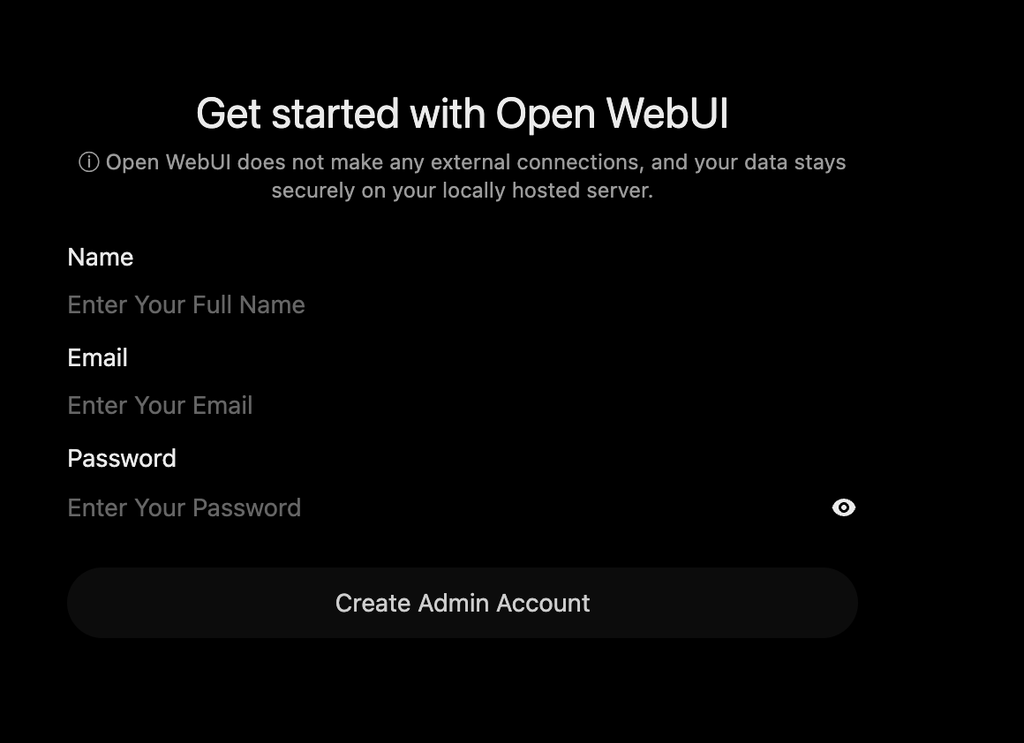
Open http://0.0.0.0:8080 in your browser. You should see something like the image below. Click on Get Started. If you are connecting to a remote aws instance open http://<public-dns>:8080 in your browser. For example, http://ec2-54-217-136-124.eu-west-1.compute.amazonaws.com:8080

Create an admin account.
Input your prompt.
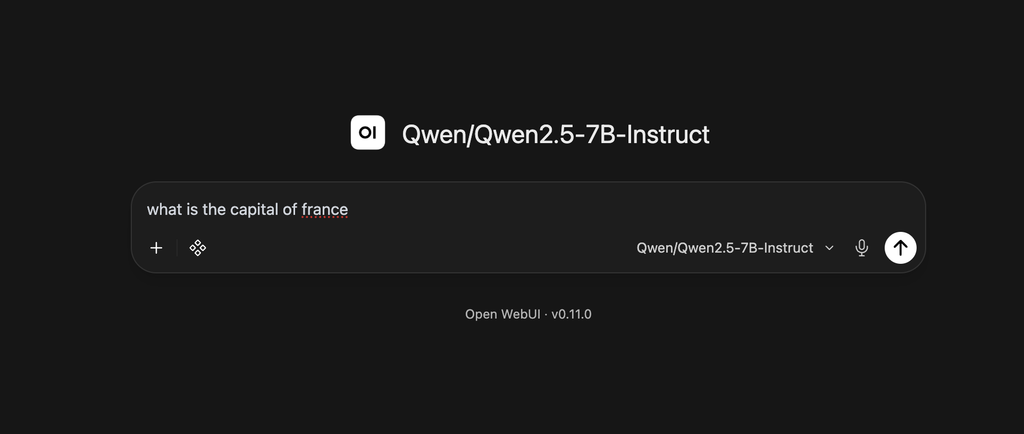
Wait for the response.

Automated performance benchmarking with cpueval
Note: Before initiating managed cpueval benchmark runs, terminate the vLLM container from Step 2 to release host port 8000.
The benchmarking workflow uses two open source tools: cpueval, a CLI wrapper around Ansible playbooks that manages container lifecycle and drives test execution, and GuideLLM, the load generator that sweeps concurrency levels and captures throughput and latency metrics. This toolchain measures key performance indicators critical for LLM serving, such as Time to First Token (TTFT), which measures how quickly the model starts responding, and Time per Output Token (TPOT), which shows how fast it generates the rest of the response.
Under the hood: Introducing GuideLLM as the benchmarking engine
To achieve realistic, high-fidelity metrics, the performance evaluation framework integrates GuideLLM, an open source LLM benchmarking tool developed by the vLLM project, as its primary load-generation engine.
While cpueval serves as the outer orchestrator—automating container provisioning, environment setup, and clean-up via Ansible playbooks—GuideLLM performs the actual heavy lifting of driving traffic against the model endpoints. Under the hood of the cpueval suites, GuideLLM carries out:
- Concurrency sweeps: GuideLLM systematically sweeps multiple concurrency levels (for example, executing parallel requests) to map the throughput and latency curve of the inference server.
- Production-like traffic simulation: It drives realistic chat/text-completion workloads against the OpenAI-compatible REST API.
- Telemetry capture: During execution, GuideLLM captures granular raw timing events to calculate critical performance metrics:
- TTFT: measures prompt evaluation delay and initial user responsiveness
- TPOT: measures generation duration for each subsequent output token
- Throughput (Tokens and requests per second): measures aggregate throughput across parallel request streams
By standardizing on GuideLLM under the hood of cpueval, this setup ensures that all CPU benchmark runs are reproducible, standardized, and aligned with industry-wide LLM serving evaluations. For the purposes of this benchmarking exercise we will need 2 AWS instances: one to act as a controller node to drive the ansible scripts (via cpueval) and another to act as a combined loadgen and Device Under Test (DUT) (the same AWS instance that was used to run vLLM and OpenWebUI).
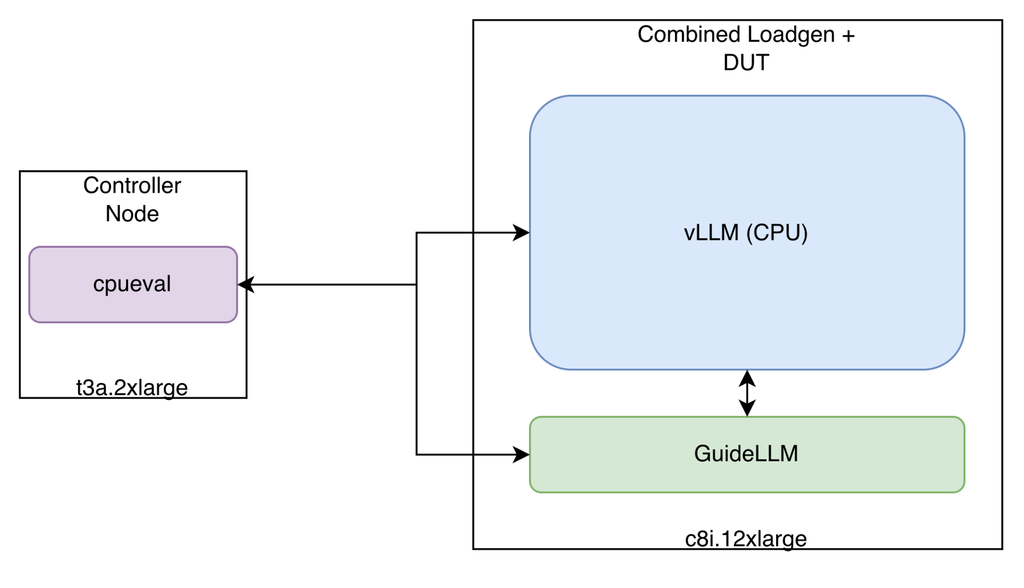
Deployment mode: co-located (single host)
cpueval supports both Single-DUT deployments (where the vLLM server and load generator run on the same machine) and Two-Node deployments (where traffic generation is offloaded to a separate host). In Single-DUT mode, cpueval automatically isolates the load generator and vLLM server onto separate NUMA nodes by default. This NUMA pinning prevents CPU and memory bus contention, giving you clean, reproducible performance baselines without needing extra infrastructure.
Authenticate and pull the Red Hat AI Inference image on the DUT node
Before running the benchmarks, the DUT must have local access to the container image. Connect to your DUT and authenticate with your Red Hat credentials to pull the image. Note the use of sudo in the commands below.
# Authenticate with your Red Hat Customer Portal or service account
sudo podman login registry.redhat.io
# Pull the Red Hat AI Inference 3.5 CPU image
sudo podman pull  registry.redhat.io/rhaii/vllm-cpu-rhel9:3.5.0-1786546771
Step 1: Install the benchmarking toolchain on the controller node
Clone the open source vLLM CPU Performance Evaluation project, which wraps Ansible playbooks and load generators into the cpueval CLI.
#0. Install git
sudo dnf install -y git
# 1. Clone the cpueval repository
git clone https://github.com/redhat-et/vllm-cpu-perf-eval.git
cd vllm-cpu-perf-eval
# 2. Install cpueval and the deps required Ansible collection dependencies
./cpueval install
Step 2: Establish connectivity between the controller node and the DUT
Establish passwordless local SSH access so Ansible can orchestrate local container management seamlessly.
# On the controller: generate the key and print it
test -f ~/.ssh/id_ed25519 || ssh-keygen -t ed25519 -N "" -f ~/.ssh/id_ed25519
cat ~/.ssh/id_ed25519.pub

# On the controller: export the following env vars
export DUT_HOSTNAME=<c8i-private-ip>
export LOADGEN_HOSTNAME=<c8i-private-ip>
export ANSIBLE_SSH_USER=ec2-user
export ANSIBLE_SSH_KEY=~/.ssh/id_ed25519
export VLLM_CONTAINER_IMAGE=registry.redhat.io/rhaii/vllm-cpu-rhel9:3.5.0-1786546771
export HF_TOKEN=hf_xxxxxxxxxxx # Required for gated models (e.g. Meta Llama)

# On the DUT add the Key from the step above to ~/.ssh/authorized_keys then
chmod 600 ~/.ssh/authorized_keys

# On the controller, verify the connection to the DUT and run the diagnostic:
ssh ec2-user@${DUT_HOSTNAME} "echo DUT reachable"

# On the controller execute environment diagnostic
./cpueval doctor

Step 3: Run automated load benchmarks
A note on single NUMA nodes: cpueval automatically detects hardware topology on the DUT, using lscpu to discover NUMA nodes, physical core layout, and available CPU ranges, and uses this to place vLLM optimally: selecting the right NUMA node(s), cpuset, and tensor parallelism degree without any user input.
Load generator placement, however, requires explicit user guidance. cpueval defaults GuideLLM to CPUs 16-31 on NUMA node 0 if no override is given, which is not always correct for your hardware.
- For multi-NUMA systems: Pin GuideLLM to a separate NUMA node from vLLM entirely—for example, –guidellm-cpus 64-95 –guidellm-numa 1— to eliminate memory bus contention.
- For single-NUMA / Cloud VMs (e.g., c8i.12xlarge): All 48 vCPUs share one memory controller, so true NUMA isolation isn’t possible. Use strict core partitioning instead to prevent CPU thread starvation and deliver a clean, best-effort baseline. Example: for vLLM on cores 0–23 (via –cores 24) and GuideLLM on cores 24–47 (via –extra guidellm_cpus=24-47).
The example below runs the chat-smoke suite on a single-NUMA instance, pinning vLLM to 24 cores and explicitly assigning GuideLLM to the remaining 24:
./cpueval run --suite chat-smoke \
  --model Qwen/Qwen2.5-7B-Instruct \
  --cores 24 \
  --workload chat \
  --extra guidellm_cpus=24-47 \
  --extra guidellm_rate=8 \
  --extra guidellm_max_seconds=120
Note: A full smoke sweep would take around 45 minutes. The example above is configured to run for a shorter time via guidellm_max_seconds. To find out more about the GuideLLM params, check out GuideLLM: Evaluate LLM deployments for real-world inference.
On test completion you should see:
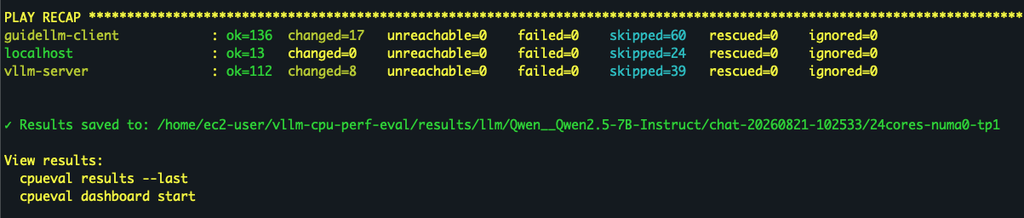
Step 4: Display the results
Render the collected metrics from the latest test run in the terminal on the controller node.
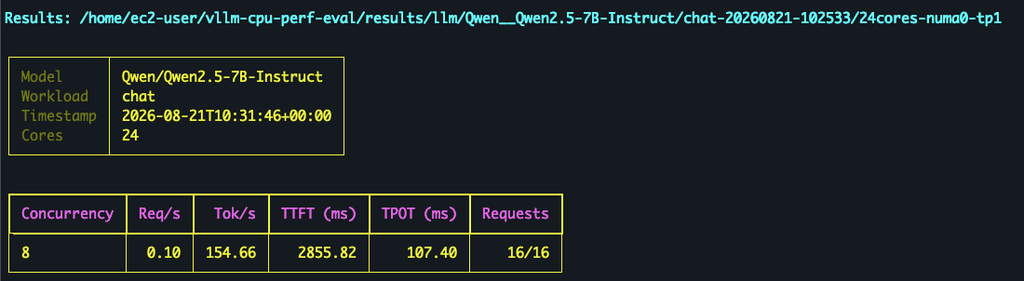
The output shows metrics for TTFT, TPOT, tokens per second throughput, and requests completed per second.
You can launch your own interactive visualization environment by executing ./cpueval dashboard start on the controller node and navigate to http://<public-dns>:8501 in your browser. For example: http://ec2-54-217-136-124.eu-west-1.compute.amazonaws.com:8501/
Troubleshooting and operational guidance
- SELinux access denied: Ensure volume mounts include the :Z flag and container startup includes
--security-opt=label=disable. - Low throughput/tail latency spikes: On dual-socket architectures, bind vLLM process execution and load generators to separate NUMA nodes to eliminate memory bus contention.
- Port 8000 conflict: Check for conflicting processes with
podman ps | grep 8000and clear existing containers.
From benchmark to business: Deploying a Red Hat AI Quickstart
By bridging optimized container serving with official, vetted solutions, you can rapidly turn standard CPU infrastructure into enterprise AI hubs.
Try the steps in this guide, then visit Red Hat’s AI quickstart catalog, which offers a collection of pre-built, production-ready enterprise templates optimized for vLLM on Intel Xeon processors and Red Hat OpenShift AI. These quickstarts provide developers with fully functional blueprints that can be deployed out-of-the-box or customized to fit specific business needs. You can explore fully released quickstarts directly in the official catalog, or preview early draft editions currently hosted on GitHub.
We suggest starting with these featured quickstart use cases:
- LLM CPU serving: a lightweight quickstart designed to give HR Representatives in Financial Services a trusted sounding board for discussions and decisions.
- Retrieval-Augmented Generation (RAG): connects LLMs directly to proprietary business data sources for precise, context-aware responses.
- vLLM tool calling: sets up LLMs with native function and tool execution features using the vLLM engine.
Note: Red Hat’s Emerging Technologies blog includes posts that discuss technologies that are under active development in upstream open source communities and at Red Hat. We believe in sharing early and often the things we’re working on, but we want to note that unless otherwise stated the technologies and how-tos shared here aren’t part of supported products, nor promised to be in the future.


