This post by the Red Hat Office of the CTO seeks to expand on previous work and further explore Crossplane as a Kubernetes Operator for provisioning, managing, configuring, and consuming cloud services. These services can then, in turn, be used to create and deploy cloud-native applications.
In this post, we will be discussing what an enterprise implementation of Crossplane could look like for infrastructure teams and developers. Additionally, we will be creating multiple collections of cloud infrastructure, which seek to abstract away the provisioning and configuration of managed resources. Finally, we will be creating an instance of Quay that will consume the collection of AWS abstracted services and infrastructure.
Note this implementation is not something that’s currently supported but we know people want to read about ideas at earlier stages.
What is Crossplane
High-level goal
One common challenge developers and infrastructure teams face when attempting to migrate to a hybrid-cloud strategy is interoperability, as each cloud provider defines their own specification for creating resources. These fundamental differences can make it difficult to construct a consistent interface for creating and consuming resources across providers.
In software development engineers strive to adhere to the DRY (Don’t Repeat Yourself) principle, however, when the time comes for deployment, it becomes much harder to avoid repeating segments of configuration files. This is where Crossplane comes into the mix–it seeks to solve these problems of interoperability by adding functionality directly onto Kubernetes.
Crossplane is an open source, Cloud Native Computing Foundation (CNCF) Sandbox project that provides a set of Kubernetes Operators to help infrastructure teams and developers adopt a hybrid-cloud strategy. Crossplane allows users to provision infrastructure from most major cloud providers (AWS, GCP, Azure), with support frequently being added for new resources and providers. By providing custom Kubernetes resources and an extensible interface, Crossplane allows users to switch between cloud providers to avoid vendor lock-in.
How it works
The infrastructure resources created by Crossplane can be accessed, edited, and deleted just like any other resource in Kubernetes. The internal state of the infrastructure resources created using Crossplane is also exposed through the Kubernetes API, allowing for integration independent of any other interfaces created by the cloud provider. Crossplane resources provide connection and authentication credentials by automatically creating secrets. These secrets can be consumed by other workloads in the cluster such as another Operator or a deployment.
Integrates with existing tools
Since Crossplane is built as an add-on for Kubernetes, it works well with existing tools in the Kubernetes ecosystem. This comes with a number of benefits since infrastructure teams can use existing tools like Helm or Kustomize to manage packages and template resources. Additionally, different packages can be created, in order, by deployment and developer teams to provide all of the dependencies for running an instance of an application. OpenShift tools like ‘oc’ and the OpenShift Console make it easier to monitor the state of cloud resources and logs.
More generally, Crossplane can work well with existing Operators, which means using existing code for deploying applications onto Kubernetes is simple and requires minimal changes. For the demo below, we were able to make minimal changes to use the Quay Operator to create an instance of Quay. Aside from Operators, environment variables can be provided to namespace scoped deployments.
Introducing Crossplane’s Composition Abstraction Feature
One challenge associated with Crossplane revolves around where it fits into organizations and the workflows regarding development, testing, and deployment. Since Crossplane integrates the cloud providers’ control plane into the Kubernetes control plane, it opens up many opportunities for us to refactor current deployment strategies and move more logic into Kubernetes. One of the key aspects of Crossplane is the Composition abstraction, which allows users to wrap multiple resources and create new custom resources that are added to the Kubernetes API.
What this means for infra teams
From an infrastructure perspective, the main tasks would revolve around preparing and maintaining a catalog of compositions for resources. These compositions could combine different resources related to a single item, one example for AWS could be a composition for creating an S3 Bucket which:
- Creates an IAM User on AWS (IAMUser)
- Creates an arbitrary, enterprise policy for the user (IAMPolicy)
- Attaches the IAMPolicy to the IAM User (IAMUserPolicyAttachment)
- Creates an S3 Bucket, with passing in the created IAM User (S3Bucket)
- Creates and attaches a bucket policy for the newly created bucket (S3BucketPolicy)
This composition could then create a secret with the credentials for the IAM user that could be used by an application. Similar compositions could be created with different policies or specific roles attached to the IAM Users instead. This could give developers more flexibility and enforce security constraints, for example, a development bucket should not have public access, but a public bucket for storing static assets should have some public objects.
What this means for deployment teams
From a deployment perspective, the process for creating a production-ready infrastructure is significantly simpler than attempting to do so manually. Creating dependencies using the standardized catalog of compositions means that we can take advantage of Crossplane and minimize the amount of manual configuration required for deployment. The compositions can help enforce security guard rails, configure replication, cluster sizes, networking, and more configuration details for resources. More generally, it is easier to replicate the same environment used during development and testing using compositions since we can repeat the configuration process in an automated fashion.
Deploying Quay using Crossplane Compositions
The first step for this walkthrough is to clone the git repository found here: https://github.com/redhat-et/crossplane-quay. This repository contains several scripts to help with creating the requirements for this walkthrough along with clean up once we are finished.
Once the repository is cloned, make sure to set the KUBECONFIG environment variable so that it points to a valid kubeconfig file. Note that Quay requires a moderately powerful cluster, and it may struggle to launch with Kind or Minikube. For this walkthrough, the easiest option is to spin an OpenShift Cluster on AWS using the openshift-install utility. This process typically takes roughly 30 minutes and detailed instructions can be found on the linked site. Similarly, at this time you should install the Crossplane kubectl plugin, this will allow you to execute some helpful commands in regards to managing the lifecycle of your providers.
$ curl -sL https://raw.githubusercontent.com/crossplane/crossplane-cli/master/bootstrap.sh | bash ... 👍 Crossplane CLI installed successfully! Have a nice day! 👋 |
When the OpenShift Cluster has been created, log on to the AWS console and extract the VPC ID and Internet Gateway ID associated with this cluster. Edit the vpcId and igwId in the helm/values.yaml file. Additionally, based on the location of your cluster, you may need to configure the region of your deployment. Samples of the variables.env and values.yaml files can be found in the samples folder of the repository.
Alternatively, if you do not want to use the openshift-install on AWS, you can use another Kubernetes cluster, however, you will need to switch the EXTERNALREDIS flag in the variables.env and helm/values.yaml to false then delete the vpcId and igwId. We need to complete this extra step because ElastiCache does not allow external access and by deleting the vpcId and igwId, the Helm template will create the VPC and Internet Gateway. Additionally, if EXTERNALREDIS is set to false, we will create a Redis deployment in Kubernetes. Lastly, the credentials for the AWS provider will be provided by extracting the credentials set up by the AWS-CLI.
With this done, all the prerequisites are set up, and we can begin the install process:
$ make build cd helm; helm template . --output-dir output wrote output/quay-cp/templates/quay.yaml ... wrote output/quay-cp/templates/aws_provider.yaml wrote output/quay-cp/templates/requirements.yaml $ make crossplane ./scripts/crossplane.sh namespace/crossplane-system created ... clusterrole.rbac.authorization.k8s.io/postgresqlinstances.database.example.org created ... clusterrole.rbac.authorization.k8s.io/networkgroup.ec2.example.org created $ oc get pods -n crossplane-system NAME READY STATUS RESTARTS AGE crossplane-xxx-xxx 1/1 Running 0 XXs crossplane-package-manager-xxx-xxx 1/1 Running 0 XXs $ make provider ./scripts/provider.sh Waiting for the provider to come up Waiting for Provider ... Waiting for Provider Provider is up secret/aws-creds created |
$ oc get provider.aws NAME REGION AGE aws-provider us-east-2 XXm $ oc get deployments -n crossplane-system NAME READY UP-TO-DATE AVAILABLE AGE crossplane 1/1 1 1 XXm crossplane-package-manager 1/1 1 1 XXm provider-aws-controller 1/1 1 1 XXm |
With that, all of the Crossplane resources are up and running.
Compositions
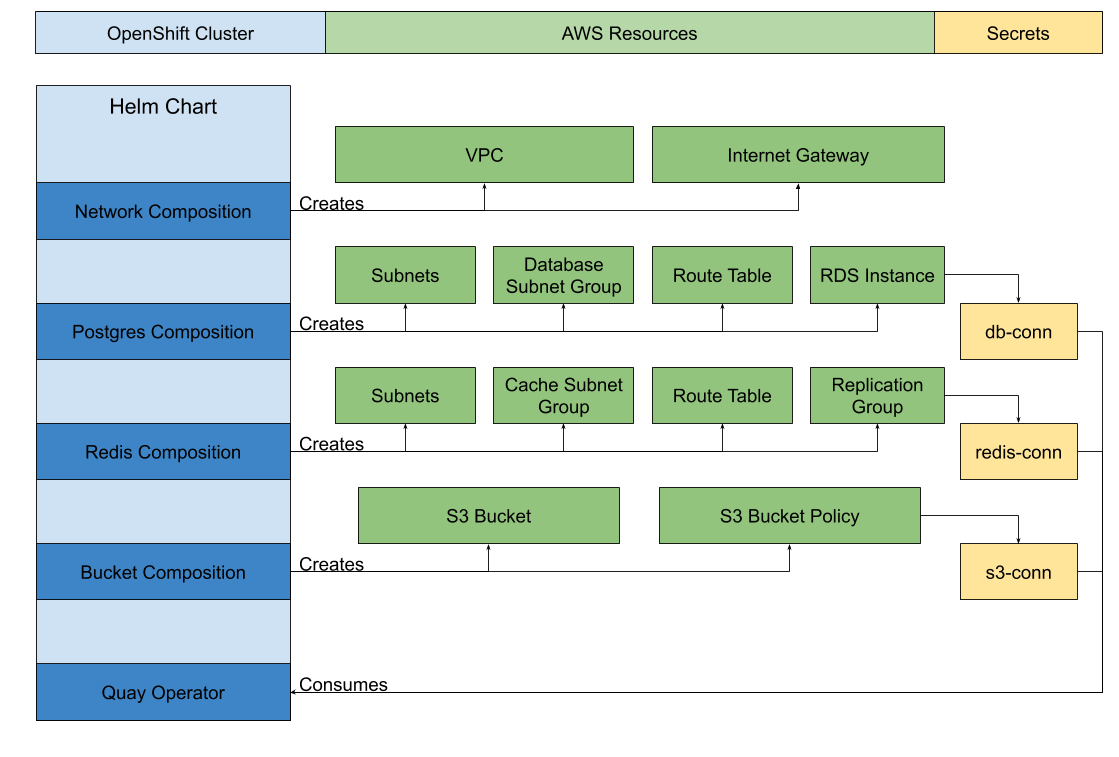
After Crossplane is up and running, we can get our dependencies running as well. There are four compositions in this deployment.
- NetworkGroup – The composition for all networking related resources.
- Bucket – The composition for everything related to the S3 Bucket and configuration.
- PostgresInstance – The composition for RDS and creating Postgres
- RedisCluster – The composition for creating and configuring the ElastiCache cluster.
Each composition creates two Custom Resource Definitions, for example, the PostgresInstance compositions create:
- postgresqlinstancerequirements.database.example.org
- postgresqlinstances.database.example.org
The postgresqlinstancerequirements.database.example.org CRD will be used to create the requirement.
We can then proceed with creating all of the compositions:
$ make compositions ./scripts/compositions.sh composition.apiextensions.crossplane.io/buckets.aws.storage.example.org created infrastructuredefinition.apiextensions.crossplane.io/buckets.storage.example.org created ... infrastructurepublication.apiextensions.crossplane.io/networkgroups.ec2.example.org created Waiting for CR - bucket NAME CREATED AT bucketrequirements.storage.example.org 2020-08-24T21:32:10Z Waiting for CR - db NAME CREATED AT postgresqlinstancerequirements.database.example.org 2020-08-24T21:32:11Z Waiting for CR - redis NAME CREATED AT redisclusterrequirements.cache.example.org 2020-08-24T21:32:10Z Waiting for CR - network NAME CREATED AT networkgrouprequirements.ec2.example.org 2020-08-24T21:32:11Z |
Note that since the compositions add to the Kubernetes API, there can be a slight delay when waiting for all the CRDs to be created. As a result, this script will block until they are all created.
To see what each composition creates you can navigate to the helm/output/quay-cp/templates folder to find all of the YAML files which detail the configuration for the resources.
With all the compositions created, we can create all of the requirements:
$ make dependencies ./make_dependencies.sh bucketrequirement.storage.example.org/s3buckettestquayredhat created networkgrouprequirement.ec2.example.org/my-network created postgresqlinstancerequirement.database.example.org/my-db created redisclusterrequirement.cache.example.org/my-redis created Waiting for S3 Bucket - 0 seconds have passed Waiting for S3 Bucket - 5 seconds have passed ... Waiting for S3 Bucket - 30 seconds have passed Bucket created Waiting for Redis Cluster - 35 seconds have passed Waiting for Redis Cluster - 40 seconds have passed ... Waiting for Redis Cluster - 255 seconds have passed Redis created Waiting for Postgres Instance - 260 seconds have passed ... Waiting for Postgres Instance - 330 seconds have passed Postgres created |
With each of these dependencies fulfilled, we can validate that their secrets exist.
$ source variables.env $ oc get secrets -n $NAMESPACE NAME TYPE DATA AGE bucket-conn connection.crossplane.io/v1alpha1 3 7m56s db-conn connection.crossplane.io/v1alpha1 6 55s redis-conn connection.crossplane.io/v1alpha1 2 3m56s |
The three secrets created are bucket-conn, db-conn, and redis-conn. These contain the connection information and credentials for the S3 Bucket, Postgres, and Redis.
Quay Operator
To create an instance of Quay, we will be using the Quay Operator. This Operator will be deployed onto the same cluster as Crossplane and the AWS Provider. The instance of Quay will consume the cloud infrastructure we created.
$ make quay ./quay/setup_quay.sh secret/redhat-quay-pull-secret created serviceaccount/quay-operator created role.rbac.authorization.k8s.io/quay-operator created rolebinding.rbac.authorization.k8s.io/quay-operator created customresourcedefinition.apiextensions.k8s.io/quayecosystems.redhatcop.redhat.io created deployment.apps/quay-operator created Waiting for Quay Operator - 0 seconds have passed Waiting for Quay Operator - 5 seconds have passed Quay operator is up oc apply -f helm/output/quay-cp/templates/quay.yaml job.batch/prep-db created quayecosystem.redhatcop.redhat.io/quayecosystem created |
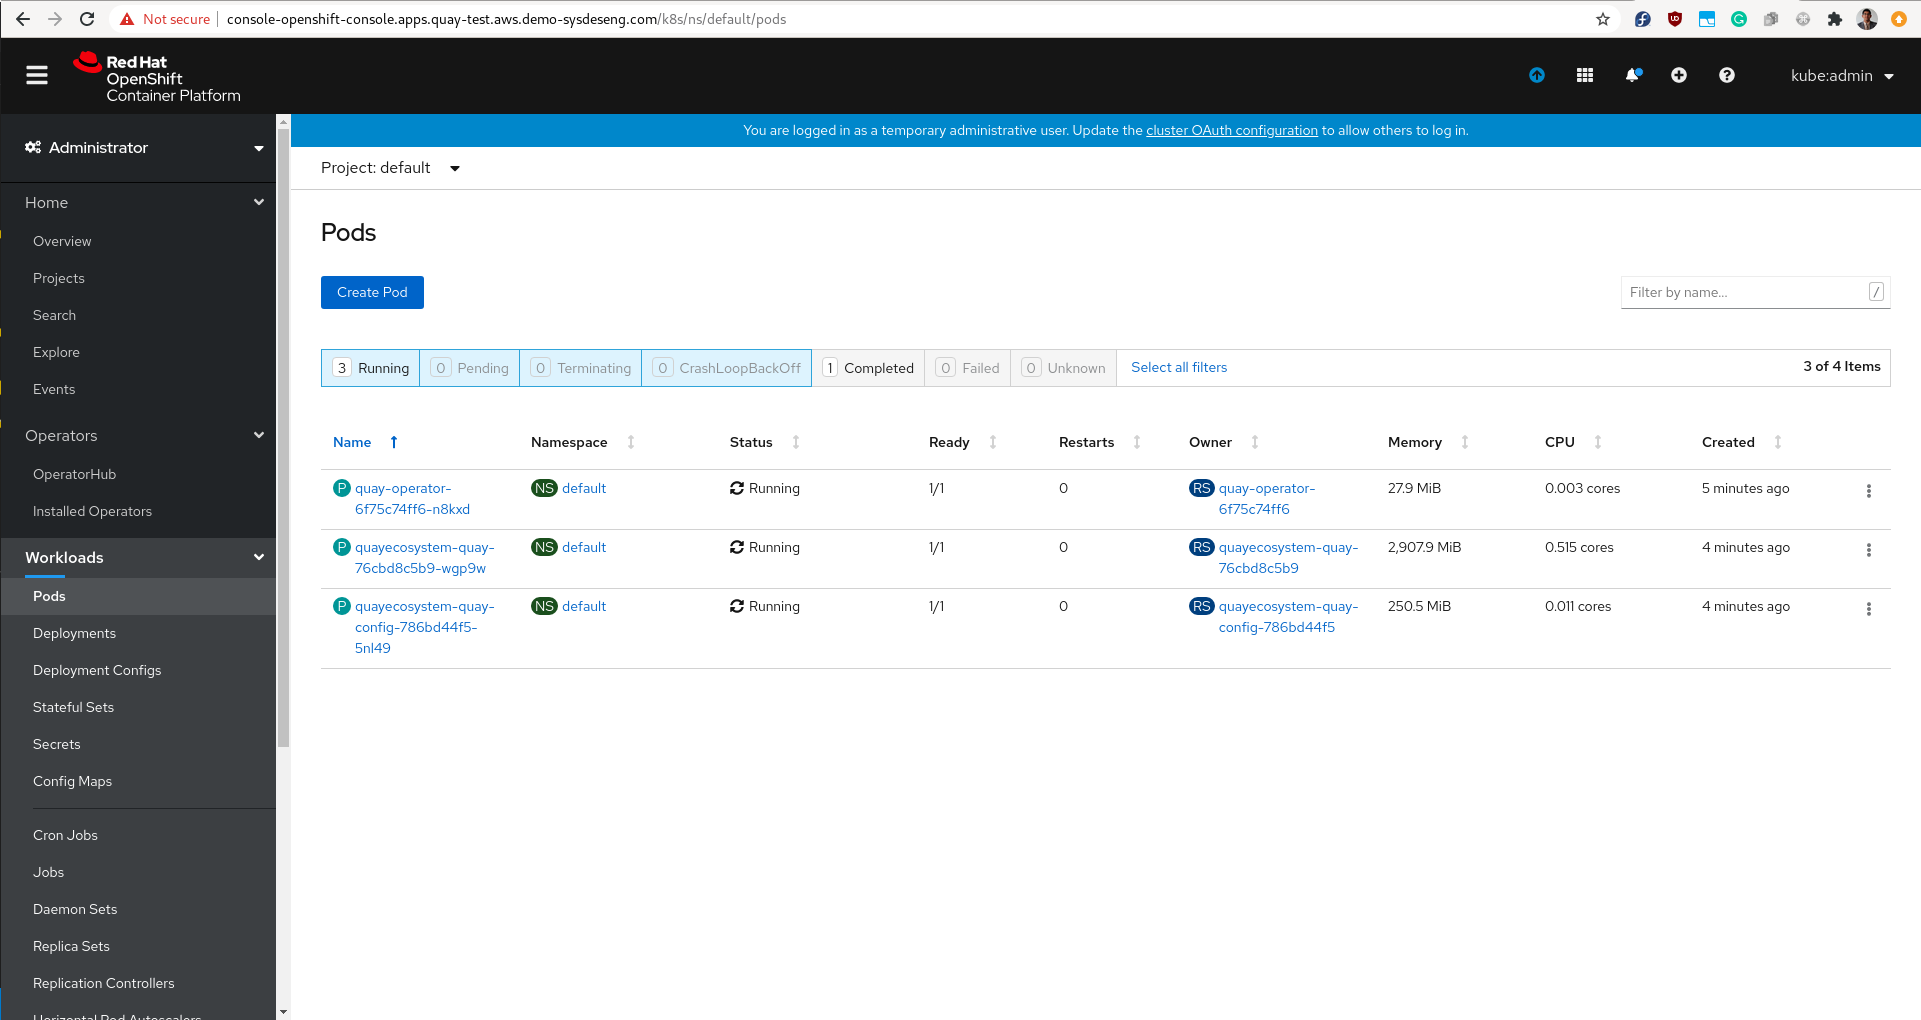
Once the quay ecosystem is created, we need to wait a few minutes for the pods to come up. Afterward, we should be able to see the following pods. This signals that Quay is up and running.
$ make quay oc get deployments NAME READY UP-TO-DATE AVAILABLE AGE quay-operator 1/1 1 1 XmXXs quayecosystem-quay 1/1 1 1 XmXXs quayecosystem-quay-config 1/1 1 1 XmXXs |
We can log on to the OpenShift Console and validate that all the pods are up.
Then, under networking, we can see the routes that we were created to access the instance of Quay.
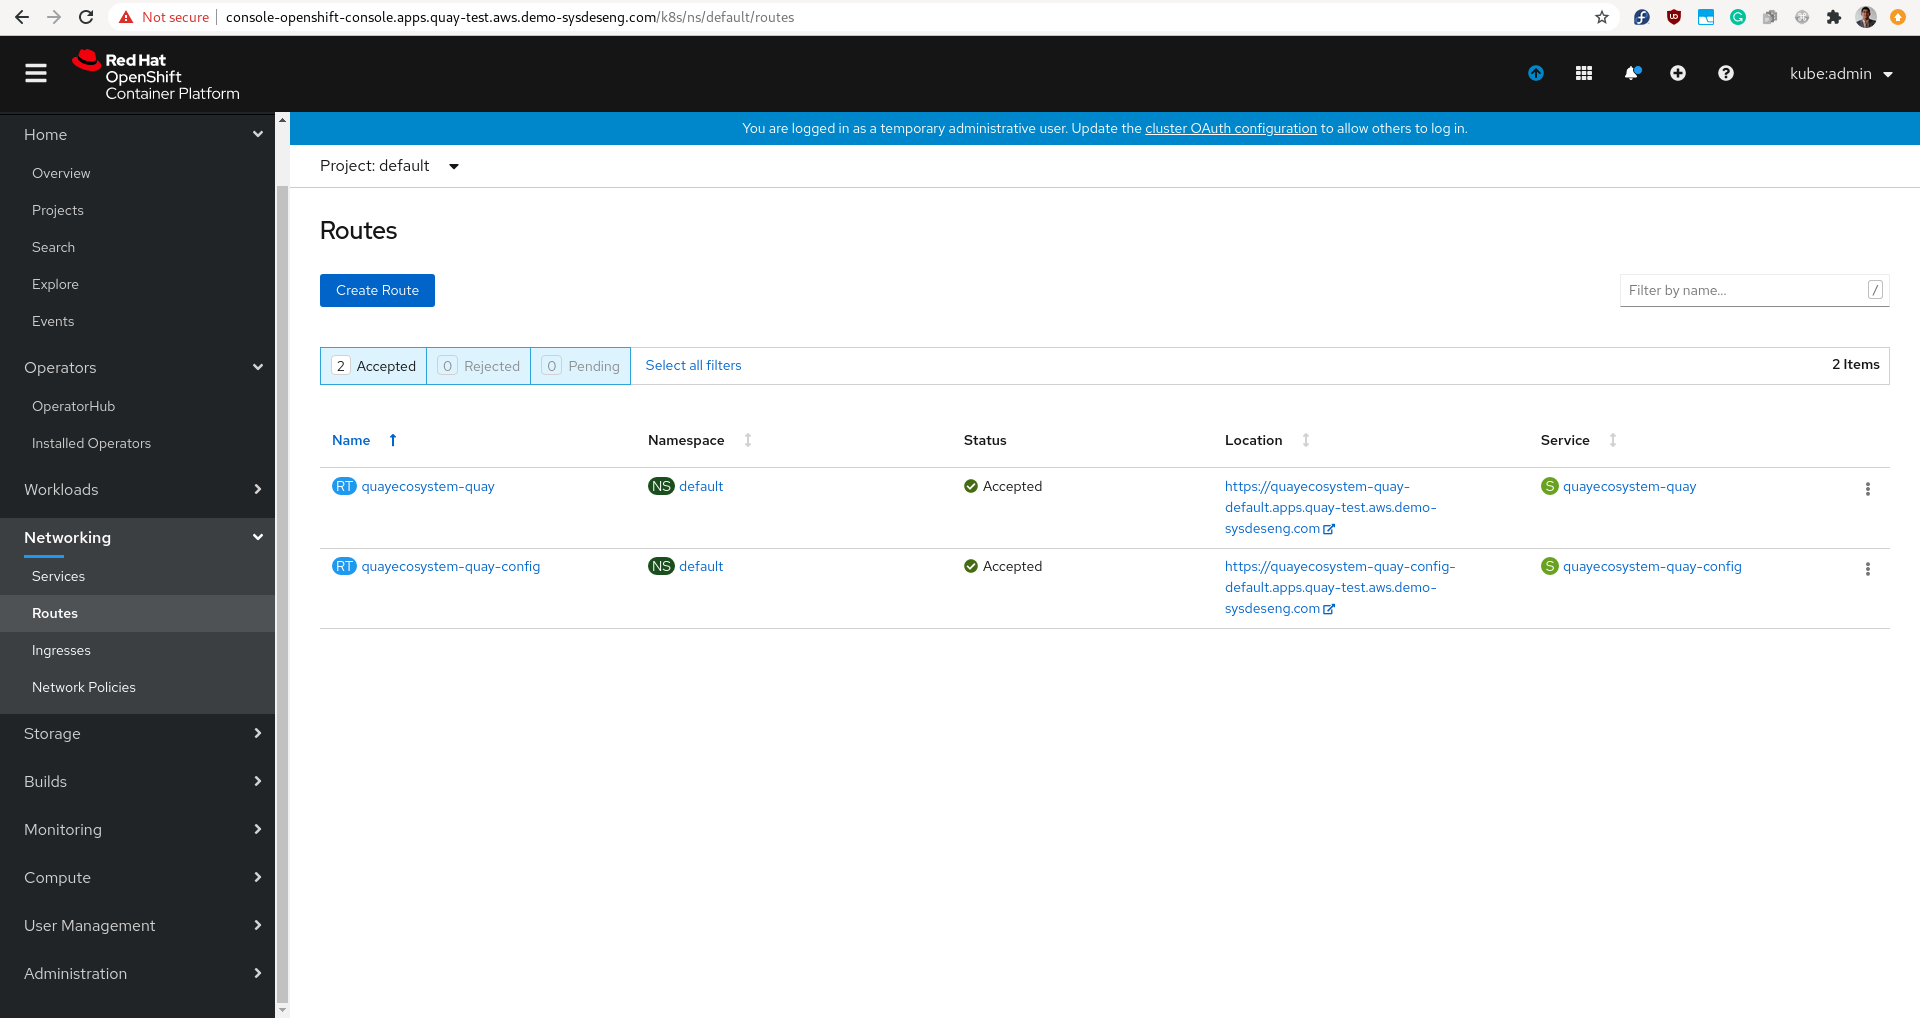
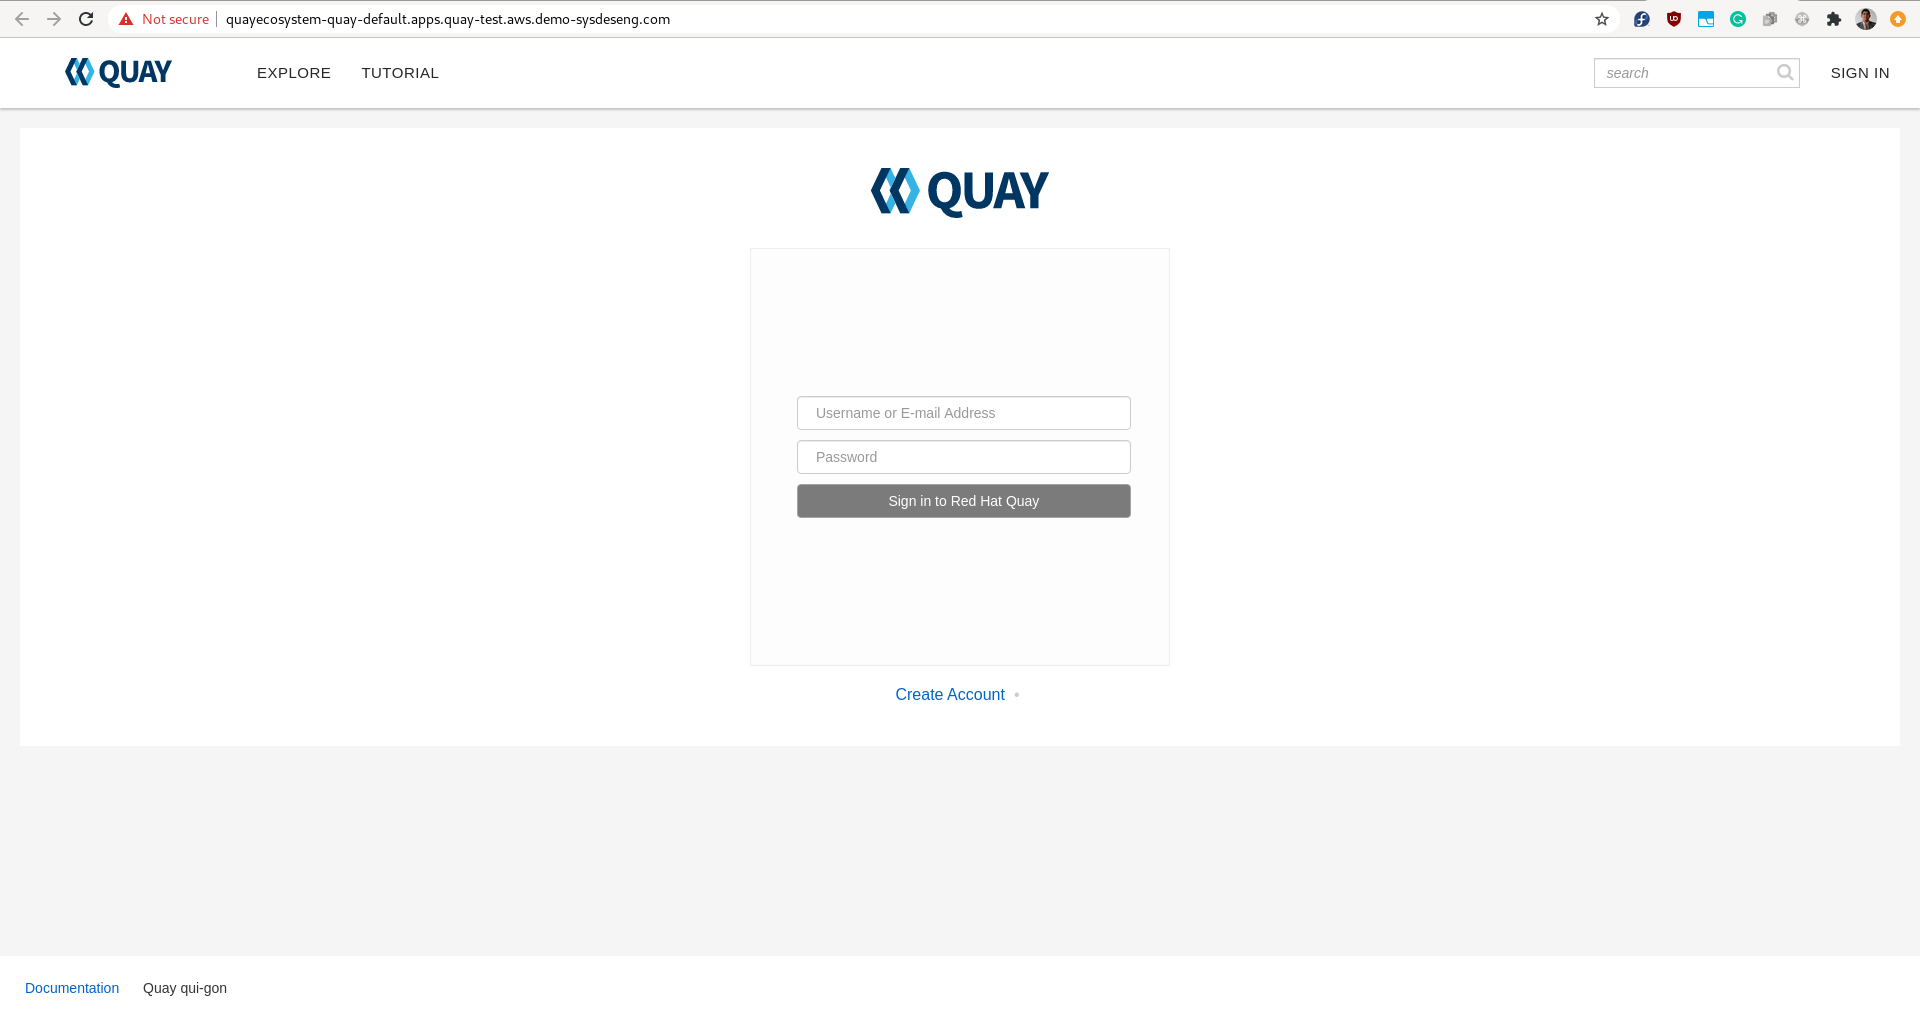
We can then open the URL for quayecosystem-quay route and access our instance of Quay:
Summary
To clean everything up, run make clean to delete your Quay instance and spin down the dependencies. Since the make command automated a lot of the components of this deployment, let’s run through each of the major steps one more time:
- First, we configured our Helm parameters and environment variables to suit our deployment; this includes region, bucket name, namespace, and external_redis flag.
- Second, we built our YAML files using Helm, and then we installed Crossplane and the AWS Provider into our cluster. We validated this result by checking the status of the deployments.
- Third, we applied all of our compositions, and then we declared requirements for each of them, which started provisioning all of the dependencies on AWS. We then blocked until each of them successfully resolved their secrets, these were all placed in our target namespace. The compositions represented here could be created by the infrastructure operators, and the requirements could be created by application operators.
- Fourth, we installed the Quay Operator, and created our QuayEcosystem resource, passing in references to our newly minted secrets. This began the process of spinning up our Quay and Quay-Config deployments. This final step could be compared to the role of application developers, who write their code against an abstract interface (e.g., an arbitrary Postgres instance or object storage bucket).
All in all, Crossplane makes the process for provisioning, configuring, and accessing cloud resources from within Kubernetes easier than ever. We welcome you to try this demo scenario out for yourself and we would love for you to get involved. If you have any further questions about this demo or Crossplane in general, please do not hesitate to ask. You can find us via the project repository.